10.31.2011

whoopie!

This may sound horrible, but we didn't carve any pumpkins this year :(  I know, I know...how could we not carve pumpkins for Halloween?  All I can say is that it just didn't happen, and instead of feeling guilty about it, we made Halloween whoopie pies instead ;)


The kids loved making them (and eating them), so I don't feel so bad about the pumpkins...sometimes it's good to mix it up! 

And yes, Avery has been wearing her Hello Kitty Halloween costume for three days now...at least I'm getting my money's worth out of it, ha!

I hope everyone has a safe and happy Halloween...I will post kids' costume pics tomorrow!

10.29.2011

diy chore chart part 2

I'm sorry yesterday's post was so short and sweet, but I'm in the middle of a basement and bedroom remodel/update, Halloween weekend, filling crafty orders for family members, and my husband's still harvesting the crops (and working his 9 to 5 job so he's pretty much been MIA around the house for the last couple of weeks) so crazy busy doesn't even begin to describe my life right now :)  On the plus side, the Cards won the World Series last night!  Whoo Hoo!!!

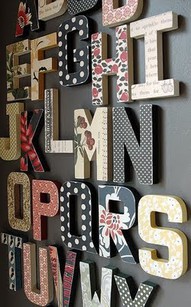
Today I started making magnets for the chore chart...

For my letter/initial magnets I used Mod Podge to adhere the paper onto the cork and then gave the top a few coats for an added seal.  I used October Afternoon Schoolhouse patterned paper and a SU! postage stamp punch to punch the letters from the paper.  I added a small magnet to the back and voila, super simple and easy magnets in a flash!


I had these vintage-looking Tim Holtz wooden game pieces in my craft room so these only required some glue and a magnet to complete.

I forgot to mention that the vinyl "chore chart" I used on the cookie sheet was from Stampin' Up!'s current catalog.  I've had that thing lying around for months now, so I'm glad I finally got to use it!  It's going to go into the new and improved playroom for the kids to keep track of their chore progress.  Hopefully this new method will work better then the old one!

Just so you know, the next few weeks will be filled with lots of DIY projects that I will be tackling because of the basement and bedroom remodel (my youngest son's bedroom that is :)  I'm on a mission and I've got a vision so bear with me on this...I might not be able to post as often, but I promise the posts will be full cute things that I hope you enjoy.  Quality, not quantity...right?

We will be attending a local Halloween parade tonight and then trick-or-treating with the kids on Monday night so I'm off to prepare for that...

I hope everyone has a fun and safe weekend filled with lots of Halloween festivities!

10.28.2011

diy chore chart

It's been another crazy week, but I did get a small project started...

 Old cookie sheet 
+

Equals =
Super easy chore chart!

More on this project tomorrow...

10.25.2011

right around the corner

I know, I know...it's a little too early to be thinking about Christmas, right?  But did you know that Christmas is exactly 60 days from today?  YIKES!!!  It's not really that far off so I thought I'd post a few pictures of some Christmas cards I've been working on recently.


I used all Stampin' Up! products for these cards :)

Hopefully, this post will help get you into the holiday spirit and maybe at least get you thinking about the upcoming festivities and events that will be upon us rather quickly :)  (I swear we were just getting back from vacation and shopping for school supplies!)

Happy Tuesday!

10.24.2011

for mary

Good Monday to you all!  I've been super busy today, of course, but I did get a chance to whip out a quick card for someone special I know that was recently diagnosed with breast cancer...and since it's also Breast Cancer Awareness month it's another good reason to post this card :)


I used Stampin' Up!'s Strength and Hope set and I added a touch of sparkle to each of the butterflies in the background and pearl accents for their antennas.  I really love the pink and gray color combo!  I hope she likes it ;)

Have a great day and as always, if you have a question or comment, feel free to leave one because I love hearing from you!

10.23.2011

easy as pie

If you know me then you know that I'm not much for cooking and baking...not that I don't cook and bake, (I mean I do have three kids and a husband that require the occasional sustenance to survive :)  It's just that it's not in my top five favorite things to do.  But for some reason all I've been doing this weekend is making pies...


Hee, Hee!


How cute are these?

I was asked by a friend to make some thank you gifts that were "pie" inspired.  I immediately started going through my paper stash, Cricut cartridges, and Sizzix dies for inspiration, but I couldn't come up with anything I was happy with.  So I got online and found an awesome tutorial for these pie magnets on a blog called  WhiMSy love.  (BTW, it's one of my new faves, so check it out!)  I fell in love when I saw how cute and easy these were to make (I need about 30!).  Plus, I already had most of the materials!  So this project turned out to be "as easy as pie" ;)

Bon Appetit!

10.22.2011

I feel awful that I haven't posted in a couple of days but I had a lot going on with the kids...parent/teacher conferences, an extra day off school, shoe and Halloween costume shopping, and a special night out with my oldest son celebrating his goal of getting all his AR points for the last 9 weeks of school!  I was so proud of him because he worked super hard and got over 23 points! (he only had to have 19 :)

We celebrated by taking him to a local hibachi restaurant he's never been to before...

Garrison and I

My hubby catching chicken in his mouth, lol!


I did, however, get to spend a little time in my craft room creating this layout of my daughter sticking candles in my birthday cake...


First, I misted the pink polka dot background and the wooden doily that the title is on with some Mr. Huey's Lunch Tray mist.  Then, I layered the scalloped paper strips, the "birthday greeting" paper, and the pictures onto my layout.  I added some pink and aqua baker's twine, brads, rub-ons, and washi tape for extra embellishment.  I used a mix of chipboard letters and letter stickers for the title and date (in the upper left hand corner) to top it all off!  Hope you enjoy!

Have a great day :)

10.19.2011

more Smash pages

Just a quick post today...

Here's a couple more pages from my Smash album.  I now have to wait a little while for some more Hipstamatic prints to arrive in the mail before I can finish it :)

I think this is hilarious!


We haven't done much today, just a little block construction and destruction, it's even rainier and colder than it was yesterday so I'm taking it easy because the next few days are gonna be BUSY...


Here's to couch snuggling for the rest of the evening!

10.18.2011

a rainy, fall day

OMG!  I just looked at my dashboard and I now have 2, count 'em TWO, followers...holla!!!  It doesn't take much to excite me, does it?  Haha!


Fall has seemed to have arrived in it's full glory of rain, cold wind, and cloudiness here in So. IL.  I even kicked the heat on last night!  I don't really mind this type of weather because I get to spend more time in my craft room, but those parked tractors and combines in the distance are a good sign that my hubby will be in a funk for the rest of the week since he won't be able to get out in the field :(

Here's a few more pages from my Smash album...


Obviously, this is a page in progress :)


I don't think the kitties know what to think about this weather :0)


I think I'm going to spend the rest of the day on the couch with a hot chai tea and a good book...ahhhh, this is why I love fall and days like this :)

Have a great day!

10.17.2011

a Smashing good time

I actually got to Smash today!  I've had my Smash album by K and Company for a few weeks now and I've been dying to get my Smash on :)

I will be posting pics all week of my pages so get ready...

I got mine at scrapbook.com.  They come in several different colors and themes so it will be hard to pick just one ;)


I was overwhelmed when I first opened my album because of all the prompts and pre-designed pages, but once I got over myself I starting whipping them out.  The whole point of a Smash album is to just go with the flow, use what you've got, and Smash it down...do what you want to do.  There doesn't have to be any rhyme or reason.  This is like scrapbooking old school style...

It's super easy and relatively cheap (about $12.99 for the album) so get Smashing!

10.15.2011

a little boost

These are some inspiring words I found on Pinterest recently.  They're located on my "Words To Live By" board.  I feel like I've always had a trying time finding my "place" or niche in the world, but lately I feel a little more directed and on a path...maybe a little change is upon me?  It's hard to explain the way I've been feeling over the last few months, sort of like I'm on fast-forward, but in a good way :)  These are great words to remind myself to stay positive, confident, and true to myself.  I wanted to share them with you because I believe everyone could use a little "stay true to you" confidence boost now and then:) 


Happy Saturday!

10.14.2011

keepsake diy

Happy Friday to everyone!

Here's a quick post about a super simple keepsake DIY that anyone with children can appreciate :)

Each of my three children has their own silver baby spoon that they either received from the hospital they were born at or received as a gift when they were born.  Each one is special and unique, just like my kids.  For a long time the spoons were in each of their rooms hidden away in drawers in the boxes they came in until I decided to use a shadowbox frame to display them all together in one place.


The only materials I used were the frame (you can find a shadowbox frame almost anywhere), a piece of 8x8 inch patterned paper for the background, some scraps of ribbon, and some wire.  I literally used the wire from a few leftover pieces of wired ribbon, I just slid the thin wire right out and it worked perfectly to secure the spoons to the patterned paper.  I tied a larger piece of ribbon to the back of the frame so I could hang it from a hook on the wall in my dining room for all to see and enjoy.  I lined the spoons up by birth order of my children and gave each one a gender-specific color of ribbon.  I told you this was super easy!

I hope this inspires you to come up with your own keepsake diy for yourself, your children, or a close friend or family member.  Have a great weekend!

10.13.2011

vacation mini

I just got a hold of the cd that our vacation pictures are on from my mom so I decided to show you a few of them and the mini album I made way back in August.

 That's us, my mom, my sister, and her husband in Destin, FL

Garrison, Jubal, and Avery at the Mellow Mushroom

Me and the fam

Garrison the mer-man


And here's the mini album...

 I used a SU! On-Board Mini Journal and various papers and embellishments from Studio Calico kits to decorate my mini.

 I didn't get real fancy with my album, just the basics...pics, stamps, washi tape, and a few stickers.  I just wanted it done!


This mini held a ton of pics which was great because I had photos from my phone, my Instax and Canon cameras, and the disposable Fuji's we got for the kids to use.  I also made an album for my mom and my sis to put their pics in, too :)

10.12.2011

it's like Facebook, without all the drama...

Have you been on Pinterest yet?  If you have, then you know that it is highly addictive and if you haven't, I must warn you that it is highly addictive :)  I've been pinning away for a couple of months now and it's really funny to go back and look through all my boards...I almost feel like a hoarder...but I have NEVER been so inspired in my life! 

Here are some useless facts about my Pinterest boards:
1.  I have a board titled Random Dancing, (any iCarly fans out there?) yet it has nothing to do with iCarly.
2.  As of right this moment I have 23 boards and 216 pins, but that will soon change as soon as I get done with this blog post!
3.  I have a board with only one pin on it...it's titled Kids Room...
4.  Sometimes I can't decide which board to put what pin on so I pin it on both!
5.  My absolute favorite board is My Style.

And here are few pins from my boards...


Are you inspired yet?  If you are then look me up, I'm on there all the time ;)

Happy pinning!